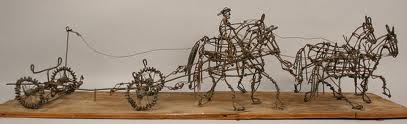
There once was a really cool artist who lived in Shelbyville, Tennessee by the name of Vannoy Streeter. My grandmother bartered with him for some artwork, with her artwork, which were ceramics. Anyway, I always thought they were the coolest things. They were sculptures made out of old wire coat hangers. I didn't know until years later how popular these are. Apparently, Mr. Streeter was one of the most famous black folk artists in Tennessee. Here is an article from the Tennessee Encyclopedia of History and Culture:


 Vannoy "Wireman" Streeter (1919-1998)
By Susan W. Knowles , Middle Tennessee State University
Self-taught sculptor Vannoy Streeter was known as “Wireman” because of the fanciful creations he fashioned from coat hangers and metal wire. Best known for his depictions of the Tennessee Walking Horse, Streeter also created scores of other images using wrapped and twisted wire. He particularly enjoyed making things with moving parts, such as cars with steering wheels that turned front and rear axles, airplanes with twirling propellers, motorcycles with kickstands, and eighteen-wheelers that actually rolled. Another favorite subject was music. Streeter created numerous figures of Elvis Presley playing guitar, and stages full of the Tina Turner Revue and James Brown with his band. By the time of his death in 1998, Streeter had gained national exposure. He participated in the National Black Arts Festival in 1990, and his work attracted collectors from around the United States.
Born in 1919 in Wartrace, Tennessee, Streeter moved with his family to what would later become a Tennessee Walking Horse farm. At the time, owners were still training their mixed thoroughbreds to prance in front of buggies. The oldest of six brothers, he learned the horse grooming and training business from his father. When the first Walking Horse Celebration was held in Wartrace, Streeter was there to observe the high-stepping front legs and sliding, low-slung back legs that created the characteristic rocking gait. After the Walking Horse Celebration moved to its current home in the county seat of Shelbyville, Streeter took special pride in the fact that African American trainers helped develop the Walking Horse style and that champion horse “Strolling Jim” was from Wartrace. Nearly every wire Walking Horse that Streeter created carried an African American rider outfitted in top hat and tails.
In a 1990 interview with folk art collector Dan Prince, Streeter recalled as a youngster fashioning toy wagons, horses, and mules from baling wire: “I saw a horse and wanted one so I took wire and made me one.” He also remembered winning a first grade art contest with a wire airplane. Seeing toy trucks, cars, and trains in the store windows of nearby Shelbyville prompted young Streeter to make the toys his parents could not afford. He continued to make wire sculpture using brand-new coat hangers (which he purchased by the five-hundred-box load) for most, bracing wire for the large-scale pieces, and fine-gauge wire for detail work. Starting with a pair of regular pliers, he would bend wire around a straight hanger bottom, snip it with wire cutters, then form and shape it with needle-nose pliers, adding thin wire for details. When he was commissioned to make twenty-five horses as awards for the Dixie Jubilee horse show in Jackson, Mississippi, Streeter, ever the inventor, claimed never to have made the same piece twice. He also created a customized set of camels for a Kentucky high-school basketball team and made numerous Walking Horses, race cars, wagons, and mules. The largest piece he ever made was a life-size Walking Horse and rider, for which a protective storage shed was built to ensure its annual display in Bell Buckle, Tennessee.
Vannoy "Wireman" Streeter (1919-1998)
By Susan W. Knowles , Middle Tennessee State University
Self-taught sculptor Vannoy Streeter was known as “Wireman” because of the fanciful creations he fashioned from coat hangers and metal wire. Best known for his depictions of the Tennessee Walking Horse, Streeter also created scores of other images using wrapped and twisted wire. He particularly enjoyed making things with moving parts, such as cars with steering wheels that turned front and rear axles, airplanes with twirling propellers, motorcycles with kickstands, and eighteen-wheelers that actually rolled. Another favorite subject was music. Streeter created numerous figures of Elvis Presley playing guitar, and stages full of the Tina Turner Revue and James Brown with his band. By the time of his death in 1998, Streeter had gained national exposure. He participated in the National Black Arts Festival in 1990, and his work attracted collectors from around the United States.
Born in 1919 in Wartrace, Tennessee, Streeter moved with his family to what would later become a Tennessee Walking Horse farm. At the time, owners were still training their mixed thoroughbreds to prance in front of buggies. The oldest of six brothers, he learned the horse grooming and training business from his father. When the first Walking Horse Celebration was held in Wartrace, Streeter was there to observe the high-stepping front legs and sliding, low-slung back legs that created the characteristic rocking gait. After the Walking Horse Celebration moved to its current home in the county seat of Shelbyville, Streeter took special pride in the fact that African American trainers helped develop the Walking Horse style and that champion horse “Strolling Jim” was from Wartrace. Nearly every wire Walking Horse that Streeter created carried an African American rider outfitted in top hat and tails.
In a 1990 interview with folk art collector Dan Prince, Streeter recalled as a youngster fashioning toy wagons, horses, and mules from baling wire: “I saw a horse and wanted one so I took wire and made me one.” He also remembered winning a first grade art contest with a wire airplane. Seeing toy trucks, cars, and trains in the store windows of nearby Shelbyville prompted young Streeter to make the toys his parents could not afford. He continued to make wire sculpture using brand-new coat hangers (which he purchased by the five-hundred-box load) for most, bracing wire for the large-scale pieces, and fine-gauge wire for detail work. Starting with a pair of regular pliers, he would bend wire around a straight hanger bottom, snip it with wire cutters, then form and shape it with needle-nose pliers, adding thin wire for details. When he was commissioned to make twenty-five horses as awards for the Dixie Jubilee horse show in Jackson, Mississippi, Streeter, ever the inventor, claimed never to have made the same piece twice. He also created a customized set of camels for a Kentucky high-school basketball team and made numerous Walking Horses, race cars, wagons, and mules. The largest piece he ever made was a life-size Walking Horse and rider, for which a protective storage shed was built to ensure its annual display in Bell Buckle, Tennessee.
Because several of the kids at our school live in the same area Mr. Streeter lived in, this story is awesome for them to hear. I love to give them examples of successful people who come from the same place. :)
Since wire hangers are REALLY hard to bend, and cut, I bought some aluminum wire from DickBlick. The kids were able to bend the wire into various shapes and create some really neat things.
I did this project with the 5th graders.
The first thing I did was cut the wire into pieces for each student. They each got 1 pc. that was about a foot long. I showed them how to bend the wire into shapes. I drew some examples on the board of things that would be relatively easy to create. Fish, flowers, hearts, etc. I told them they could draw it out first if they wanted, or just try it freehanded if they wanted. This was really an experiment for me, to see how it would go. I made them spread out all over the room so they wouldn't poke each other. Thank God there were no injuries! Here are the best ones they came up with- The adorable little snail is my son's.



 Vannoy "Wireman" Streeter (1919-1998)
By Susan W. Knowles , Middle Tennessee State University
Self-taught sculptor Vannoy Streeter was known as “Wireman” because of the fanciful creations he fashioned from coat hangers and metal wire. Best known for his depictions of the Tennessee Walking Horse, Streeter also created scores of other images using wrapped and twisted wire. He particularly enjoyed making things with moving parts, such as cars with steering wheels that turned front and rear axles, airplanes with twirling propellers, motorcycles with kickstands, and eighteen-wheelers that actually rolled. Another favorite subject was music. Streeter created numerous figures of Elvis Presley playing guitar, and stages full of the Tina Turner Revue and James Brown with his band. By the time of his death in 1998, Streeter had gained national exposure. He participated in the National Black Arts Festival in 1990, and his work attracted collectors from around the United States.
Born in 1919 in Wartrace, Tennessee, Streeter moved with his family to what would later become a Tennessee Walking Horse farm. At the time, owners were still training their mixed thoroughbreds to prance in front of buggies. The oldest of six brothers, he learned the horse grooming and training business from his father. When the first Walking Horse Celebration was held in Wartrace, Streeter was there to observe the high-stepping front legs and sliding, low-slung back legs that created the characteristic rocking gait. After the Walking Horse Celebration moved to its current home in the county seat of Shelbyville, Streeter took special pride in the fact that African American trainers helped develop the Walking Horse style and that champion horse “Strolling Jim” was from Wartrace. Nearly every wire Walking Horse that Streeter created carried an African American rider outfitted in top hat and tails.
In a 1990 interview with folk art collector Dan Prince, Streeter recalled as a youngster fashioning toy wagons, horses, and mules from baling wire: “I saw a horse and wanted one so I took wire and made me one.” He also remembered winning a first grade art contest with a wire airplane. Seeing toy trucks, cars, and trains in the store windows of nearby Shelbyville prompted young Streeter to make the toys his parents could not afford. He continued to make wire sculpture using brand-new coat hangers (which he purchased by the five-hundred-box load) for most, bracing wire for the large-scale pieces, and fine-gauge wire for detail work. Starting with a pair of regular pliers, he would bend wire around a straight hanger bottom, snip it with wire cutters, then form and shape it with needle-nose pliers, adding thin wire for details. When he was commissioned to make twenty-five horses as awards for the Dixie Jubilee horse show in Jackson, Mississippi, Streeter, ever the inventor, claimed never to have made the same piece twice. He also created a customized set of camels for a Kentucky high-school basketball team and made numerous Walking Horses, race cars, wagons, and mules. The largest piece he ever made was a life-size Walking Horse and rider, for which a protective storage shed was built to ensure its annual display in Bell Buckle, Tennessee.
Because several of the kids at our school live in the same area Mr. Streeter lived in, this story is awesome for them to hear. I love to give them examples of successful people who come from the same place. :)
Since wire hangers are REALLY hard to bend, and cut, I bought some aluminum wire from DickBlick. The kids were able to bend the wire into various shapes and create some really neat things.
I did this project with the 5th graders.
The first thing I did was cut the wire into pieces for each student. They each got 1 pc. that was about a foot long. I showed them how to bend the wire into shapes. I drew some examples on the board of things that would be relatively easy to create. Fish, flowers, hearts, etc. I told them they could draw it out first if they wanted, or just try it freehanded if they wanted. This was really an experiment for me, to see how it would go. I made them spread out all over the room so they wouldn't poke each other. Thank God there were no injuries! Here are the best ones they came up with- The adorable little snail is my son's.
Vannoy "Wireman" Streeter (1919-1998)
By Susan W. Knowles , Middle Tennessee State University
Self-taught sculptor Vannoy Streeter was known as “Wireman” because of the fanciful creations he fashioned from coat hangers and metal wire. Best known for his depictions of the Tennessee Walking Horse, Streeter also created scores of other images using wrapped and twisted wire. He particularly enjoyed making things with moving parts, such as cars with steering wheels that turned front and rear axles, airplanes with twirling propellers, motorcycles with kickstands, and eighteen-wheelers that actually rolled. Another favorite subject was music. Streeter created numerous figures of Elvis Presley playing guitar, and stages full of the Tina Turner Revue and James Brown with his band. By the time of his death in 1998, Streeter had gained national exposure. He participated in the National Black Arts Festival in 1990, and his work attracted collectors from around the United States.
Born in 1919 in Wartrace, Tennessee, Streeter moved with his family to what would later become a Tennessee Walking Horse farm. At the time, owners were still training their mixed thoroughbreds to prance in front of buggies. The oldest of six brothers, he learned the horse grooming and training business from his father. When the first Walking Horse Celebration was held in Wartrace, Streeter was there to observe the high-stepping front legs and sliding, low-slung back legs that created the characteristic rocking gait. After the Walking Horse Celebration moved to its current home in the county seat of Shelbyville, Streeter took special pride in the fact that African American trainers helped develop the Walking Horse style and that champion horse “Strolling Jim” was from Wartrace. Nearly every wire Walking Horse that Streeter created carried an African American rider outfitted in top hat and tails.
In a 1990 interview with folk art collector Dan Prince, Streeter recalled as a youngster fashioning toy wagons, horses, and mules from baling wire: “I saw a horse and wanted one so I took wire and made me one.” He also remembered winning a first grade art contest with a wire airplane. Seeing toy trucks, cars, and trains in the store windows of nearby Shelbyville prompted young Streeter to make the toys his parents could not afford. He continued to make wire sculpture using brand-new coat hangers (which he purchased by the five-hundred-box load) for most, bracing wire for the large-scale pieces, and fine-gauge wire for detail work. Starting with a pair of regular pliers, he would bend wire around a straight hanger bottom, snip it with wire cutters, then form and shape it with needle-nose pliers, adding thin wire for details. When he was commissioned to make twenty-five horses as awards for the Dixie Jubilee horse show in Jackson, Mississippi, Streeter, ever the inventor, claimed never to have made the same piece twice. He also created a customized set of camels for a Kentucky high-school basketball team and made numerous Walking Horses, race cars, wagons, and mules. The largest piece he ever made was a life-size Walking Horse and rider, for which a protective storage shed was built to ensure its annual display in Bell Buckle, Tennessee.
Because several of the kids at our school live in the same area Mr. Streeter lived in, this story is awesome for them to hear. I love to give them examples of successful people who come from the same place. :)
Since wire hangers are REALLY hard to bend, and cut, I bought some aluminum wire from DickBlick. The kids were able to bend the wire into various shapes and create some really neat things.
I did this project with the 5th graders.
The first thing I did was cut the wire into pieces for each student. They each got 1 pc. that was about a foot long. I showed them how to bend the wire into shapes. I drew some examples on the board of things that would be relatively easy to create. Fish, flowers, hearts, etc. I told them they could draw it out first if they wanted, or just try it freehanded if they wanted. This was really an experiment for me, to see how it would go. I made them spread out all over the room so they wouldn't poke each other. Thank God there were no injuries! Here are the best ones they came up with- The adorable little snail is my son's.